Overview
The Seeker App is free and available on Apple (iOS) and Android powered devices.
Displays
- Depth, temperature and speed of the probe(s)
Functionality
- Select freshwater or saltwater mode to automatically configure the data for either application.
- Identify probe mounting location on the vessel.
- Uniquely identify probes by number.
- Choose from a variety of data sets to best suit user’s application (such as depth and speed only for rapid data communication to identify the thermocline)
- Demonstration Mode available for previewing the system’s functionality
Units of Measure (UoM)
- Fahrenheit / Celsius
- Feet / Meters
- MPH / KPH / KNOTS
Compatibility with iOS and Android
- iOS (Apple) operating system
- Version 13.0 and newer
- The oldest devices compatible with the app will be iPhone 6S, iPhone SE, iPad Air 2, iPad Mini 4
- Android operating system
- Version 10.0 and newer
- The oldest device compatible with the app will be Google Pixel 1
- Version 10.0 and newer
- Tablet requirements
- Bluetooth 5.0 or higher
- BLE Audio / LC3 or extended advertising
Scotty Seeker™ app language support
- English and French
- The Scotty Seeker™ app is available in English and French. On iOS and Android devices, the app automatically adjusts to match the language settings of the host device. If the device is set to a language other than English or French, the app defaults to English.
- On multifunction displays (MFDs), the app cannot detect the host language and will default to English. However, users can manually switch between English and French within the app’s settings menu.
Thermocline Mode
- Access Thermocline Mode
- Select Channel 1 (Probe 1) when configuring your probe
- Any probe can be changed to Probe 1, but only one probe can use this channel at a time.
- To view the thermocline graph, there are two methods:
- The thermocline graph is only available to be viewed on Probe 1. When viewing the depth/temperature/speed data for Probe 1, swipe from the bottom of the screen to the top to view the thermocline graph.
- To return to the Seeker Probe data screen, swipe from the top of the screen to the bottom.
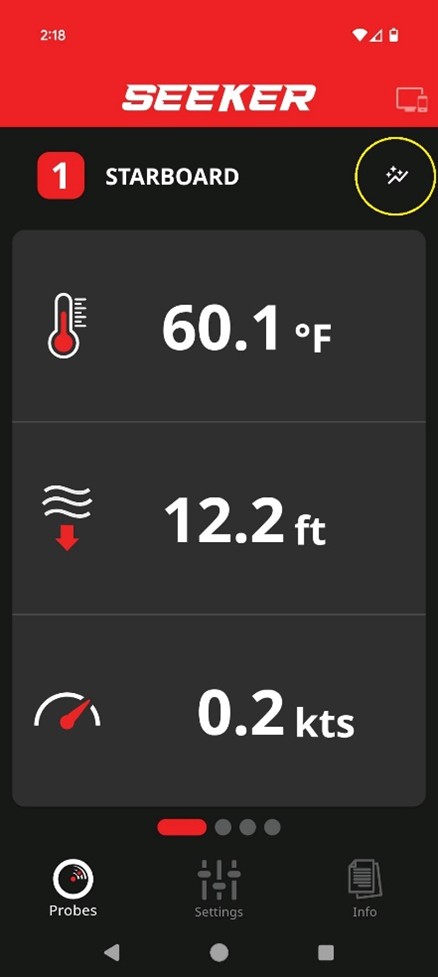
- When viewing the Seeker Probe data, click the icon in to the right of your probe location (circled in yellow in the example picture below) to view the thermocline graph. To return to the Seeker Probe data, swipe from the top of the screen to the bottom.

- The thermocline graph is only available to be viewed on Probe 1. When viewing the depth/temperature/speed data for Probe 1, swipe from the bottom of the screen to the top to view the thermocline graph.
- Select Channel 1 (Probe 1) when configuring your probe
- To clear the thermocline graph data:
- When viewing the thermocline graph, click the trash can icon in the top right corner to clear the recorded data at any time.
- To clear the thermocline graph data:
Demonstration Mode
- To access the Demonstration (Demo) Mode on the Seeker App:
- Connect your Seeker Hub to a power source, and then access the Seeker App from your iOS or Android powered device, or your Multifunction Display (MFD) that is connected to the Seeker Hub via Ethernet
- Open the Seeker App
- Go to Settings > Select ‘Hub Settings’
- Near the bottom of this menu, select ‘Demo Mode’
- Go to Settings > Select ‘Hub Settings’
- To exit Demonstration (Demo) Mode
- Disconnect the power from your Seeker Hub. Once the Seeker Hub is powered back on, it will no longer be in Demonstration Mode
App
How is the Seeker Probe data displayed on the Seeker App?
- When using the Seeker App on a tablet or connected multi-function display (MFD/Sounder):
- The Seeker App will only show the data for up to two (2) probes at one time on a tablet or multi-function display (MFD/Sounder).
- To view the data for every Seeker Probe when using three (3) or more probes simultaneously on a tablet or MFD:
- While using the Seeker App, swipe the screen right-to-left to change the view from Probes 1 & 2 to view data for Probes 3 & 4. Swipe left-to-right to go back to view data for Probes 1 & 2.
- When using the Seeker App on a mobile device:
- The Seeker App will only display in a vertical orientation, and will only show the data for one (1) probe at a time
- To view Seeker Probe data when using two (2) or more probes simultaneously on a mobile device:
- While using the Seeker App, swipe the screen right-to-left or left-to-right to view the data from each probe individually.
- To view the thermocline graph, there are two methods:
- The thermocline graph is only available to be viewed on Probe 1. When viewing the data for probe one, swipe from the bottom of the screen to the top to view the thermocline graph. To return to the Seeker Probe data screen, swipe from the top of the screen to the bottom.
- When viewing the Seeker Probe data, click the icon in to the right of your probe location (circled in yellow in the example picture below) to view the thermocline graph. To return to the Seeker Probe data, swipe from the top of the screen to the bottom.
- When using the Seeker App on a tablet or connected multi-function display (MFD/Sounder):
- To clear the thermocline graph data:
- When viewing the thermocline graph, click the trash can icon in the top right corner to clear the recorded data at any time.
- To clear the thermocline graph data:
Change the probe data units
- First verify that you are connected to the Seeker hub with your mobile device or multi-function display. From the Settings menu choose Hub Settings. Find the Units menu and choose between Celsius and Fahrenheit, and Miles Per Hour, Kilometers per hour or Knots, and Meters and feet
Losing probe data or intermittent data when trolling
- Placement of the hydrophone is important and following the installation instructions that came with it is important. Turbulence, bubbles can cause an interruption in the signal. Make sure the placement of the hydrophone is not in a spot where these things occur. Moving the hydrophone to the opposite side of the kicker motor might help.
- Certify that your probe is within 100 meters (300 feet) of the surface. Anything deeper could cause intermittent data.
Speed data is intermittent or inconsistent
- If you have consistent speed performance at slower speed but notice that it becomes more inconsistent at higher speed or in strong current, those forces may be significantly altering the pitch or angle of the probe to an extreme degree. Slowing the boat speed or finding an area of slower current may solve the problem.
Using more than one probe and the data is incorrect
- Your probes may be using the same channel, in this case the Hub has trouble identifying which data come from which probe. Check the probe settings and change their channels if they are the same.
- Garmin MFD is not displaying the Seeker App when using a router
- The Garmin MFD and the Seeker Hub may have different Ethernet settings, preventing communication between them. To connect with other devices, the Seeker Hub uses an automatic Ethernet setup. Typically, it is set to work seamlessly with a standard router installation, requiring no additional configuration. However, if you are using a Garmin MFD, you need to change the setup accordingly since Garmin MFDs operate on their own network setup. To solve the issue: If possible, connect the Seeker Hub directly to the Garmin MFD. Or, deactivate the DHCP server of the router (refer to your router support material).
- “Cannot Find Your Hub” message on mobile device
- Check that the Hub is connected to a power supply and is on. LED lights will be on.
- Make sure the mobile device has Bluetooth on.
- If the setup is correct, it means that another mobile device is already connected to the Hub and probe by Bluetooth. Only one device at a time will be able to connect wireless via Bluetooth.
Probe
Seeker App will not connect with the probes
- There are two ways to connect to the probes: one for set-up; and another for data.
For set up: Make sure Bluetooth is turned ON, on your mobile device. A probe must either be on the charger or have just been removed from the water for Bluetooth to operate on it. Once the probe is on the charger, open the Seeker App and tap Settings > Configure Your Probes. You should see the probe that is on the charger appear in the list in the app.
Once removed from the water, the probe’s wireless connectivity is activated and will remain available for up to 10 minutes for connection and configuration. Make sure the probe is close to your connected device and has enough power to connect.
For data retrieval: The probe must be in the water and located below the hydrophone. Connect your wireless device to the Seeker Hub to receive data from the probe in the water. Or Connect your MFD to the Seeker Hub with a Cat5 ethernet cable for viewing data on the App or the MFD screen.
- There are two ways to connect to the probes: one for set-up; and another for data.
Change the probe data units
- First verify that you are connected to the Seeker hub with your mobile device or multi-function display. From the Settings menu choose Hub Settings. Find the Units menu and choose between Celsius and Fahrenheit, and Miles Per Hour, Kilometers per hour or Knots, and Meters and feet
Hub
Verifying data is transmitting
- Placement of the hydrophone is important and following the installation instructions that came with it is important. Turbulence, bubbles can cause an interruption in the signal. Make sure the placement of the hydrophone is not in a spot where these things occur. Moving the hydrophone to the opposite side of the kicker motor might help.
- Certify that your probe is within 100 meters (300 feet) of the surface. Anything deeper could cause intermittent data.
- If you have consistent speed performance at slower speed but notice that it becomes more inconsistent at higher speed or in strong current, those forces may be significantly altering the pitch or angle of the probe to an extreme degree. Slowing the boat speed or finding an area of slower current may solve the problem.
Ethernet cable
- Any category 5 ethernet cable will work, however if you are trying to connect to a Simrad or Lowrance unit, you will need an adapter cable (Yellow cable 5 pin male: RJ45 Female 2M; Navico part number: 000-127-56)
Hydrophone
No data on the Seeker App
- Check the Seeker Hub LEDs on the front to verify if power is on. If not, check your power source that the Seeker Hub is connected to, for verification that the power is on to the Seeker Hub.
- Make sure the probe is deployed in the water under the hydrophone
- Make sure the channel being viewed on the app matches the channel of the probe in the water
- Once power is confirmed, check the Seeker Hub LEDs for Data. When a probe is powered and connected to the Seeker Hub, the LED for Data will flash if the Hub is actively receiving data from the probe. Confirm the Data LED is flashing with the probe deployed under the hydrophone
- If you are still not receiving data on the Seeker App, review the mounting location of the hydrophone to determine if it is being obstructed by another object or turbulence from a motor propeller.
Probe Developer and Diagnostic Mode
To access Developer Mode on the Seeker App
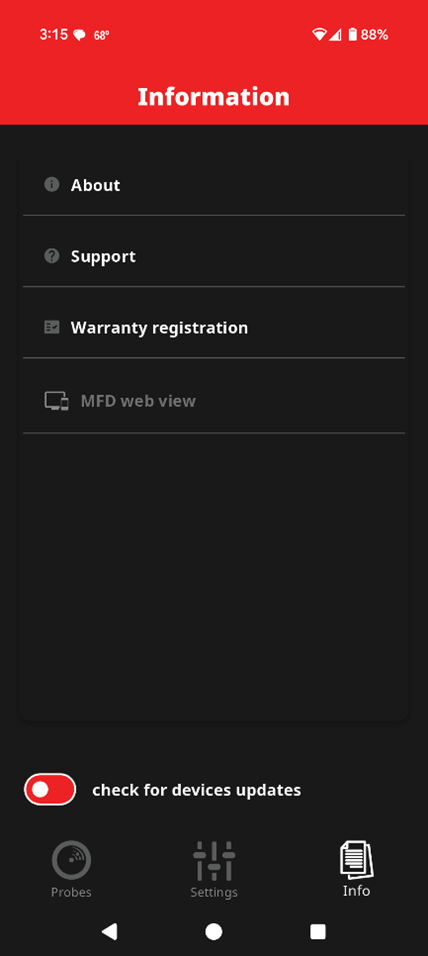
- Go to the “Info” tab in the app
- Perform the following swipes on the screen:
- Up, Up, Down, Down, Left, Right, Tap in middle of the screen.
- A window will pop-up saying “Developer Mode activated”
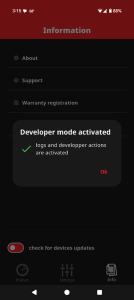
- Go to the “Info” tab in the app

How to enter the probe test mode / E-paper / Diagnostic / Developer / Diagnose
- Place the Probe on the Seeker charging dock, and leave it on the charging dock for the duration of this process. Open the Seeker App
- Go into Developer Mode on the Seeker App
- Go into Developer Mode on the Seeker App
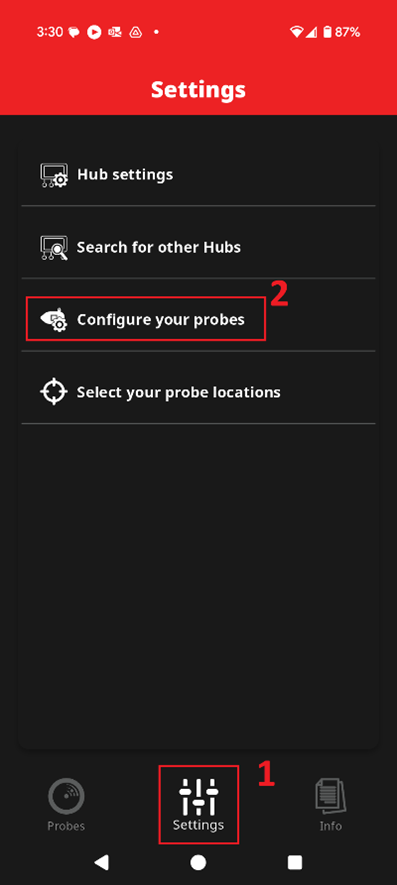
- In the Seeker app
- Go to Settings, then select “Configure your probes”.
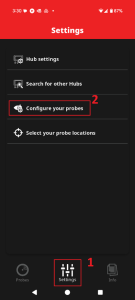
- Go to Settings, then select “Configure your probes”.
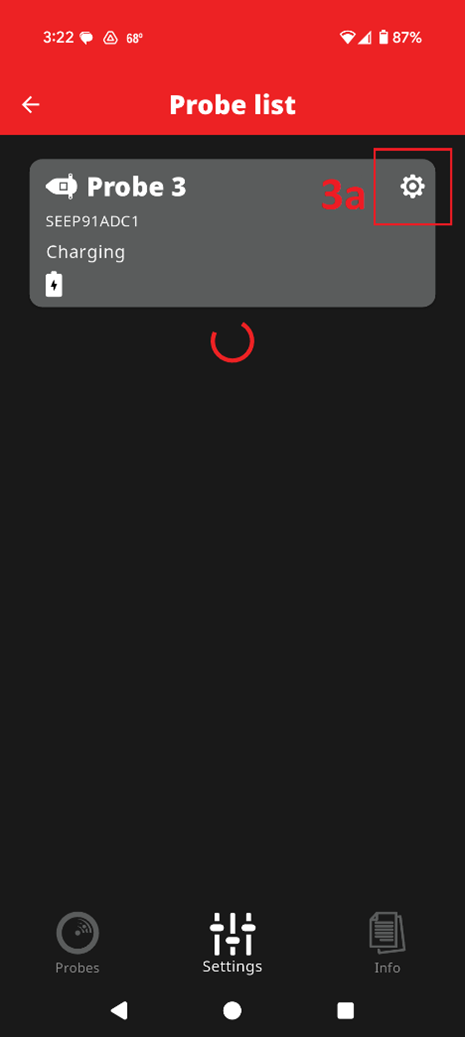
- The Probe List will open
- From this list, find the probe you want to test, and select the Settings icon in the top right corner.
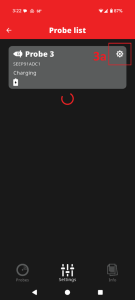
- From this list, find the probe you want to test, and select the Settings icon in the top right corner.
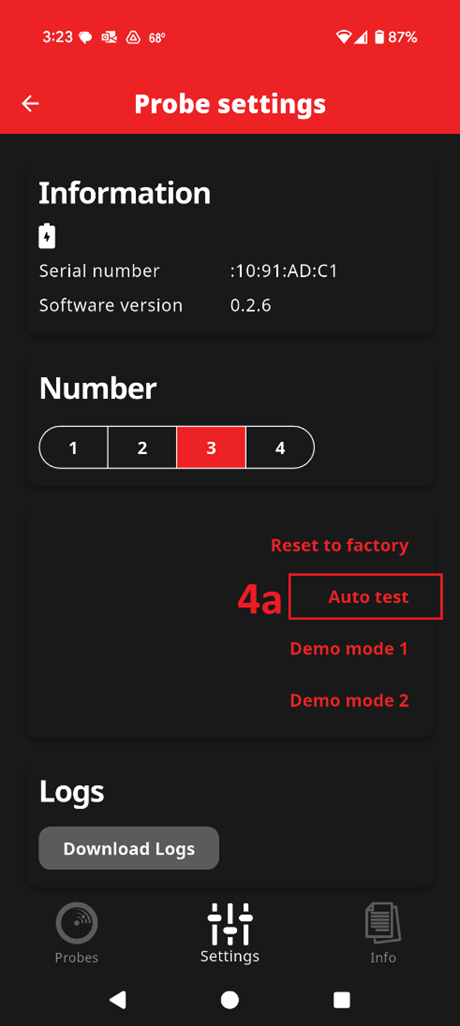
- From the Probe Settings page
- Select “Auto Test”
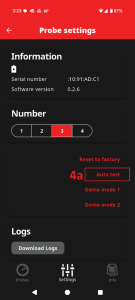
- Select “Auto Test”
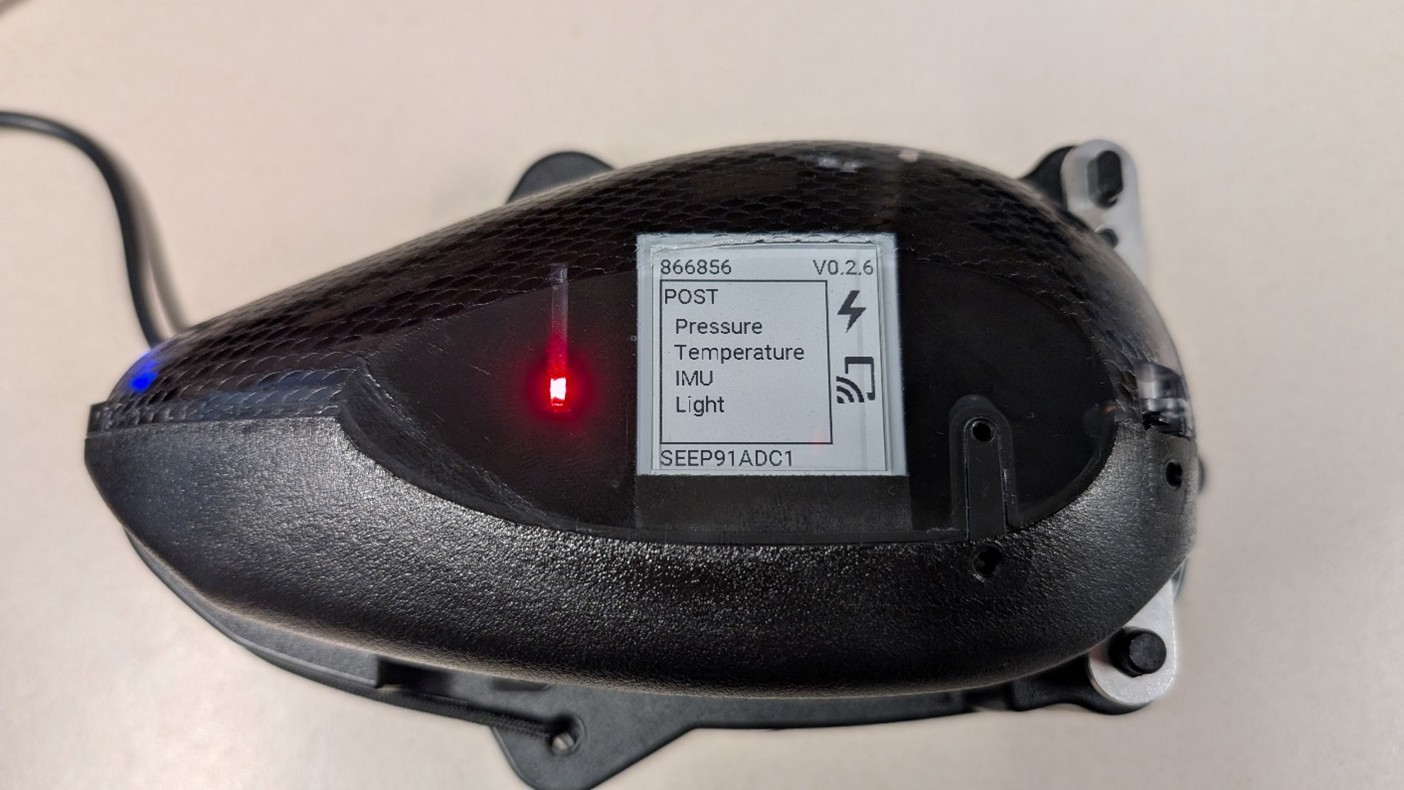
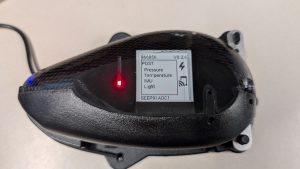
- The e-paper display on the Seeker Probe will now display the following information
- Post
- Pressure
- Temperature
- IMU
- Light
- Post
- To diagnose issues on the probe
- Black text with a white background (as shown in the above image) indicates that all functionality of the probe is working properly
- White text with a black background (this can also be described as a black box around any of the four words: Pressure; Temperature; IMU; Light) indicates that there is an error with that specific functionality.
- To exit diagnostic mode on iOS and Android devices:
- Close the Seeker app on your mobile device
- Open the Seeker app again, and go to the Probe Settings
- After a brief moment, the display on the probe will flash and then change to a normal operating display, indicating that the probe has returned to normal functionality.
- Place the Probe on the Seeker charging dock, and leave it on the charging dock for the duration of this process. Open the Seeker App